Wednesday, 07 December 2011

Replacing Old Vinyl Ceiling

We decided to install a new ceiling even the original still was in a relatively good condition. There was however some dirty spots every here and there that could not be removed. The original padding was left untouched. The overall work took us 8 hours to finish and it is definitely handy to have two persons involved in the process. There is lots of useful information available online to help one with the task, even installation videos on Youtube.

Original ceiling, detached from the window frames.

The padding unfolded from underneath the vinyl ceiling. It was in good condition so it was left untouched.

We started by assembling the rods and fixing the front at its place. The direction was from front to back, one section at the time. The main concern was to avoid wrinkling and hanging of the material. The heat gun was used to warm up the vinyl; this enabled to properly tighten the material when fixing it. Adhesive glue was used to fix the ceiling onto the window frames.

Interior after the installation.

Interior after the installation.

Monday, 28 November 2011

Replacing Rubbers

After all the car is dated from 1967 and unbelievably most of the rubbers were still original. And one could clearly see that; they were hard, dry and breaking. While busy restoring the car it makes sense to replace all of the rubbers at the same time. So all the engine compartment, front compartment, lights, bumber, body and window rubbers were replaced. It is unfortunate that most of the current rust problems could have been avoided if this car's rubbers would have been replaced years ago, when they first started showing signs of ageing.

Replacing the front rubber

Restoring the Front

The next step after overhauling the engine was the front. The drips of brake fluid had caused some rusting that needed to be fixed and the petrol tank needed some facial uplift, but otherwise everything under the hood seemed to be in quite good condition, dirty but good. Even the spot for the spare tyre was in excellent condition even that is one of the most common places to discover rust problems.

Front before restauration

After the petrol tank and the front tyres were out it was easy to discover some nasty rusting on the driver's side, rusting starting from the compartment's lower corner continuing all the way to the mud guard side. This is were the Volkswagen engineers weren't too clever as the flat bottom plate structure allowes the water to stay and stand there causing problems. Why it couldn't be a bit inclined? Also it was apparent that the water had got in between the floor plate and the body as the rusting on the mud guard side was quite severe.

Removing rusted plates under the mud guard

The rusted parts were removed and the new ones welded in. The whole compartment was cleaned, degreased, sandpapered and deoxidised after which it was covered with the rubber mass paint. Also the gap between the floor plate and the body was sealed with silicone to disable the water to get into the body.

New plates and protective rubber mass paint

As an end result a rust free and protected compartment. Hopefully also worry free for quite some time into the future. Only time will tell.

Front compartment after restoration

The rubber mass paint was also used to cover the spare tyre compartment as it is very durable and easy to keep clean, not to mention it is working well in watery conditions. The petrol tank was completely repainted; with rubber mass paint from below and with glossy black from the top. The service opening covers and the horn were also repainted.

Front after restoration

After everything was put back the end result came out neat and clean. New addition, a loose mat, will protect the space from the dirt and bumps.

Front ready

Tuesday, 15 November 2011

Restauration Follow Up

Apologies for the long blog silence. Within these last couple of months we've been busy with fixing the front of the bug, the space under the petrol tank to be more specific. We're very close to the finish line and hopefuly we can download some before and after pictures together with a restauration story in two weeks time.

Wednesday, 28 September 2011

Engine Overhaul, Step 4

Almost there, final steps of the assembly.

A test start before installing the engine into the car, checking for oil leaks.

Cleaned bell housing and replaced gearbox mountings.

It was easy to repaint the underbody while the engine was out.

Replacing the engine compartment rubber seals.

Engine overhauled, installed and running smoothly, as new!
We'll measure the new engine output values after some running kilometers.

Some experts say that re-assembling a beetle engine is a relatively quick job taking
around 4 hours to do. According to our experience one must be prepared to spend
quite a few days with the re-assembly. We recognise that we are not professionals with
all the best tools but we did the job properly taking time to get all the details right.

Engine Overhaul, Step 3

New and old push rod tubes

New piston rings

Replacing packings on engine

Refurbished cylinder head

Assembling the engine

Engine Overhaul, Step 2

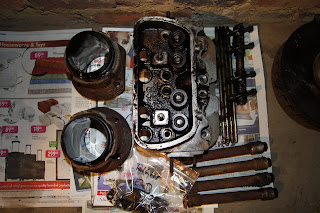
Head and barrels removed from the engine.

Head and barrels. They've seen better days..

Cleaning the piston ring grooves.

Paint stripping

Wire brush cleaning

Some of the re-painted parts.
We used high heat resistant paint for all the engine parts.

Thursday, 15 September 2011

Painting and Bodywork

Beetle is finally out of repainting. The overall painting job wasn't quite the quality what we expected but as is it is adequate and what was most important, all the rusty spots have been fixed and we also replaced both of the floor boards. Everything is now fixed, the ruby red color looks good and all we wait is to get the engine overhauled and put it back to its place.


Wheels at the Vaal 2011

On Saturday 3rd September we drove to the annual Wheels at the Vaal in Vanderbiljpark. Great wide tree covered area next to a river with lots to see for the whole family; old engines, veteran tractors, vintage cars, spare parts and more. At this stage we have started to feel a bit anxious to get our bug ready and join all these other beautiful beetles at the show. But there is still couple of months to go before the work is done.

Tuesday, 30 August 2011

Ferdi's VW Swop Meet 2011

 Last Sunday we headed to the annual VW event, Ferdi's VW Swop Meet in Midrand. Saw lots of beautiful bugs, the original looks were especially wonderful giving great many ideas how to restore our beetle and make it look at its best. We also had the chance to go through piles of spares that were on sale. Made on feel that what you couldn't find there you won't need. If you'd want to join the fun next year please follow Motorhead's events on internet or The Big Five Events on Facebook.

Engine Overhaul, Step 1

According to "Without Guesswork, Type 1, 2 and 3" VW Service Book, August 1968 the 1300 cm2 40 bhp engine compression should be between 135-106 psi. The measured compression value was 70-75 psi which is below the specified value. Engine didn't smoke so eighter the valves were leaking or the rings were worn. Other problems discovered were that the crank case seal was leaking, the engine was very dirty and the paintwork on the engine covers and other parts was rusted.

Engine before removal

Engine removed

Before a wash. A good example of how engine should not look.

High pressure cleaning. We had to clean the engine before stripping it to prevent the dirt getting into the engine.

Engine after the wash

Wednesday, 10 August 2011

Cars in the Park at Zwartkops

We had a very enjoyable Sunday at Cars in the Park last weekend. Loads of beautiful old cars occupied the race track from head to toe. Hopefully we'll be there next year with our Kewer! Naturally the section that we were most interested in was the Volkswagen oldies. In addition we managed to find couple of good contacts such as Historic VW Association Southern Africa which is a club restricted to air-cooled VW's up to 1967 model and for purists only, not for modified vehicles. That is our aim with our Kewer so we are now eagerly waiting if they will accept us as their new members. Another recommended club in the Pretoria area is the organiser of the event; Pretoria Old Motor Club (POMC). Due to our restoration project, and a damaged front bumper, we've been battling weighter to purchase a totally new bumpber or restore the old one. At the event we came across with a company in Johannesburg which made a quite an impact with their rechromed products so that is where our front bumper will end up to in near future. More about the bumper a bit later on. Another quite useful link got from Cars in the Park was a sell and buy portal in the internet called Classic Cars. If you are looking for an old vintage car that might be another place worth while looking into in addition to JunkMail.

Ready for Repainting and Some Bodywork

The Beetle has now stripped and taken to the repainting. At the same time the floor plates from both sides will be replaced due rusting and the stepping boards will be fixed as they've suffered some bumps in the past. While the car is at the garage our main focus will be on the engine. It needs to come out and have some serious TLC. Hoping to add the whole engine story together with the pics here in one months time.

Thursday, 21 July 2011

Finding Painter

As a result of rust appearing here and there on the body we decided that it is time to take the car to repainting before the problem gets any worse. As we have decided to keep the car as close to the original as possible the only color option is the original Ruby Red. More about the original body colors and color codes in the previous posting. The rims will be light greay as described in the Tyres and Rims posting.

The biggest challenge with repainting is to find a painter one can trust the work with. We ended up choosing a painter from Centurion who has lots of experience in painting bugs, and in the related bodywork in general. there is always an old car or a bug standing at shop's front yard. For us that was a good sign. We have now met the shop manager, gone through the car inch by inch and made the paint and needed bodywork plan.

We will take the car to the shop at the end of July and expect it to be ready in two months time. While the car is in painting we will concentrate on fixing the engine, sourching rubbers and rechroming the front bumper.

Beetle Paint Colors and Codes

One can check the original color of one's Beetle from the chassis number plate which in our case was located in the front, under the bonnet behind the spare tyre. Please however keep in mind that the code printed to the plate might not always be the same with the actual body color. There are lots of reported cases where the paint code on the plate is different from the original color on the body. These things just happened way back then. Our case is also alike. The code written on the plate is 14 (VW Blue) even the original body color is 100% sure Ruby Red (code 11). So it is always a matter of cross checking the plate and the body. One can analyse if the body is repainted or if it is original color. In our case there is no doubt that Ruby Red is the correct original color.

The 1967 original Beetle body color options that we've fount are Black L41 (code 10), Ruby Red L456 (code 11), VW Blue L633 (code 14), Lotus White L282 (code 42), Java Green L518 (code 20), Zenith Blue L639 (code 08), Savannah Beige L620 (code 02) and Fontana Grey L595 (code 09).

One can find original colors from old Volkswagen brochures. TheSamba.com has a great archive of old original brochures for different years in their litterature section. We found ours from 1967 brochure "It Comes in 7 Colors" and "1967 VW Beetle Sales Brochure" which also included the interior options. The brochures are lacking actual codes so those we found from TheSamba.com Type 1 Color Combinations Chart which includes Beetle Paint Code Listing. The list also includes original interior color combinations used with any particular body color. Wolfsbürgwest has also highly recommended Beetle Color Charts on their web page where you can search colors according to the particular production year. We also found a Glasurit Vintage Color Recipe Book ie paint mixing instructions from TheSamba.com discussion forum.


Finding Parts

Finding Beetle parts around the Pretoria area wasn't such an easy task as one would think. After all there is thousands of Beetles on the road in every day use in South Africa. There is however Volkswagen and Beetle specialised shops such as Volksparts. The main problem is the availability of restoration parts. Shops have lots of fancy new shiny bling bling parts for pimp my ride kind of Beetles that at the end of the day are far from the original look. There are also lots of restoration parts available by order but the delivery times are very long and usually shops cannot even confirm when the parts will arrive. Shops usually seem to have "keeping no stock" policy  and everything is ordered from Europe. They order one or two pieces of each part and when they arrive after weeks of waiting period they also are sold almost immediately and we are back in the waiting game.

We have used the local shops but in addition we have also ordered parts directly from Europe. Fortunately we are in that position that our European friends can bring parts to us as they are visiting South Africa relatively often. By this way we have access to parts and accessories that are more challenging or sometimes impossible  to get from South Africa. Please note if you order parts outside South Africa there most probably will be tax added at the customs.

It is also advisable to visit scrap yards in order to find parts one is missing. For example we were told that it is close to impossible to get a trim for the front window but a visit to the Pretoria Volkspares' scrap yard proved the opposite and we walked out with a perfect trim.

One can also find parts from Junkmail.

Tyres and Rims

First things first, getting new tyres. Ours are bought from Hi-Q. In the beginning we wished to purchase white wall tyres fro the bug but they turned out to be almost four times more expensive than normal tyres so it didn't happen.

There are also white wall imitation parts available that are added between the tyre and the rim. They look relatively good and the price is reasonable. We've seen them on sale at the Volkswagen and old car events and they most probably can also be ordered from local VW part shops such as Volkspares. We however decided not to go to that direction; it is real white wall tyres or normal tyres. No imitation parts.


When replacing the tyres we also had a change to take better look at the rims. We've got 6 rims which all but one is in relatively good condition. They are just a bit mix match when it comes to color; metallic silver, white and light grey. Even according to the original Sales Brochure the correct color combination for the Ruby Red body paint is white rims we decided to go with light grey. For some reason it pleases our eyes more as the white just seems to be too white and shiny. The interior is black, white and grey combination so in that respect the grey goes well with the rim as well. The rims will be fully light grey without any different inner/outer stripes.


Plan for Restoration

From the very beginning it has been clear that our motto is to keep our Beetle as close to the original as possible. Therefore also all restorations are done in a way that first we will try to use the original parts, and if that is impossible we will try to find eighter an old similar part or to purchase a new equivalent. Also the body paint color and interior will be remained as they are. the only thing that we will add is another side mirror to the left side as we've discovered it to make the driving in the traffic much easier and safer.

The overall plan is:

1) Repaint the body and the rims
2) Fix the stepping boards
3) Replace the rusted bottom plate with a new one
4) Overhaul the engine
5) Check and fix the electrics
6) Rechrome the front bumper
7) Replace some of the damaged parts with new ones
8) Repaint some parts of the interior (gear shift, hand brake, metal frames of the seats, ...)
9) Clean and polish

VW Logo Day 2011

Beetle & VW Club Johannesburg arranged the VW Logo Day on 28th May 2011 at the Riversands Farm, Johannesburg in order to raise funds for the SA Guide Dogs Association. Anyone could bring their Beetle, Kombi, Karmann Ghia, Type 3, Buggy or any VW based kit car in any condition to the event. The cars were parked to the field in a VW logo shape and captured from a helicopter above. It was a great day to see lots of vintage Beetles and meet other enthusiasts. Thank you Beetle & VW Club Joburg!


Finding Information

As a first time old car owners we've found it to be crucial to find information to get the restoration done correctly. Easier said than done but luckily we live in the age of World Wide Web. The best place for us has been TheSamba.com which has lots and lots of old brochures and technical information. Highly recommended!


There are also quite many related books available. One good source to search litterature is Amazon and here in South Africa Kalahari.com. We ended up purchasing Haynes Repair Manual for Beetle & Karman Ghia from a local book store. The manual provides good basic information how to repair the bug but unfortunately we've not fount it to fulfil our expectations to be as detailed as we would have needed it to be.


The best source however is always the other Beetle enthusiasts. They've seen it, done it and got the T-shirt; they know the best places to go, can answer the questions that puzzle you and if not, they know who to turn to. So go to Volkswagen meetings and old car events and get together with the other fellow old car enthusiasts. They've all faced the same problems and challenges that you are going through and most of them are more than pleased to share their knowledge.